Table of Contents
Getting Started
This document details the process of integrating YouAppi’s SDK with your Unity app.
If you have any question you can email us to: support@youappi.com
Requirements:
- Android: Minimum API level: 16, Android 4.1
- iOS:
- Xcode 10.1+ (Swift 4.0 +, Objective C).
- iOS 9.0+ target deployment.
- armv7, arm64 devices, and the simulator.
Download YouAppi’s Unity SDK
Unity latest SDK version can be downloaded as a ZIP file from the following URL:
The ZIP file contains:
- SDK unity package – youappi-sdk-unity.unitypackage
- Sample app – youAPPiUnitySample
Import YouAppi Package
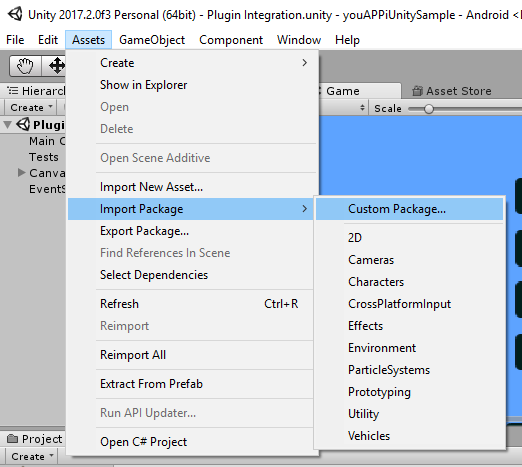
- Open the Unity project you would like to integrate with YouAppi SDK.
- Go to Assets → Import Package → Custom Package

- Select youappi.unitypackage from its location on disk.
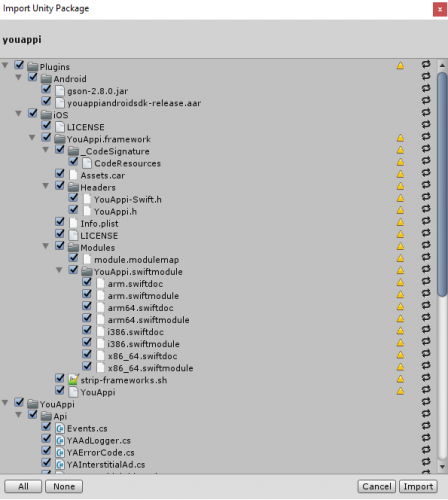
- A dialog will be opened showing the package contents.
- Make sure all assets are selected and press import copy the content of the package to your project.

Using YouApi SDK on your project
Example is shown for rewarded ad unit, but behavior is the same for all ad units.
- Create YouAppi instance an initialize it using your Access Token:
// Use YouAppi library using YouAPPiSDK.Api; // Create YouAppi instance and initialize it youAppi = new YouAppi(); Debug.Log("Initialize YouAppi SDK"); youAppi.initialize("<Your Access Token>"); - Create a rewarded video instance with and arbitrary ad unit id. Please make sure that ad unit id is constructed only from letters, numbers or underscores.
- Connect the rewarded video with LoadSuccess and LoadFailure events. If rewarded video is loaded successfully then show it.
- Load rewarded video ad unit.
rewardedVideoAd = youAppi.rewardedVideo("RewardedVideoAdUnitId");
rewardedVideoAd.LoadSuccess += (sender, AdUnitEventArg) => {
    Debug.Log("Rewarded video was loaded");
    rewardedVideoAd.show();
};

rewardedVideoAd.LoadFailure += (sender, ErrorEventArgs) => {
    Debug.Log("Failed loading rewarded video. Reason: " + ErrorEventArgs._errorCode + ", message: " + ErrorEventArgs._errorMessage);
};

rewardedVideoAd.load();
GDPR User Consent
The userConsent flag value should be determined by the app developer according to the User’s response to a Consent Request and according to the user being subject to the GDPR rules (e.g.: a EU residence). The userConsent flag value signals to YouAppi the permission to process and store the user’s Personal Information (e.g.: Advertising ID and IP address). In case that the flag value is false, YouAppi may decide not to response to the ad request, since the user cannot be detected and its actions cannot be attributed to the user and hence also to YouAppi and to the app developer.
GDPR user consent can be passed in the following ways:
- It is mandatory to pass user consent in SDK init:
youAppi.initialize(accessToken, userConsent);- User consent can be set by using:
youAppi.userConsent = true;- If the user is known to be in an age restricted class (e.g.: under the age of 16 in some countries or under the age of 13 in other countries ) then the age restricted indication should be passed:
youAppi.ageRestrictedUser = true;Build project for Android
-
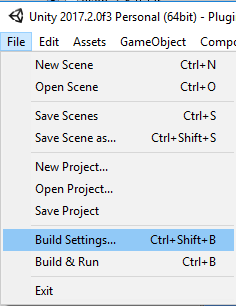
- Go to File → Build Settings…
- Choose Android from the left list.
- Change Build System to Gradle (New).
- Check Export Project.
- Check Development Build.
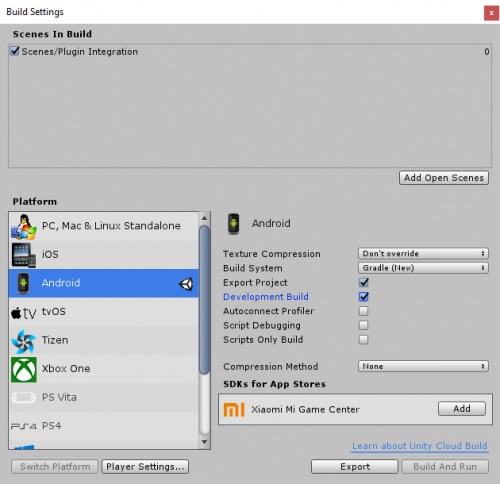
- Press Export and select the folder on which the Android project will be created.
- Go to File → Build Settings…

Build for iOS
- Go to File → Build Settings…
- Choose iOS from the left list.
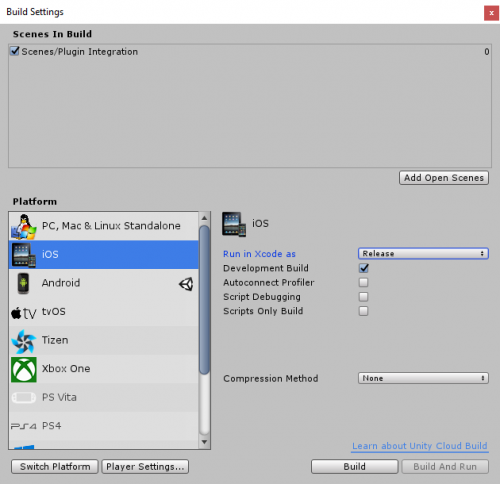
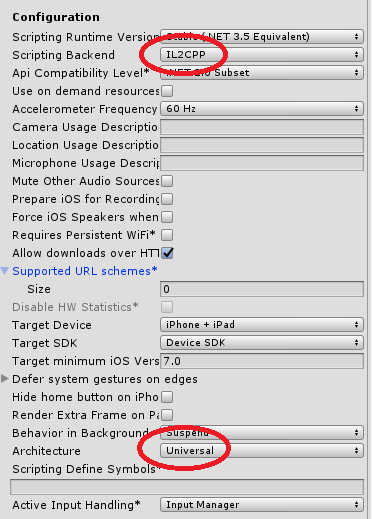
- On Player Settings… under Other Settings section make sure that:
- Archtecture is set to Universal
- Scripting Backend is set to IL2CP

- Press Export and select the folder on which the iOS project will be created.
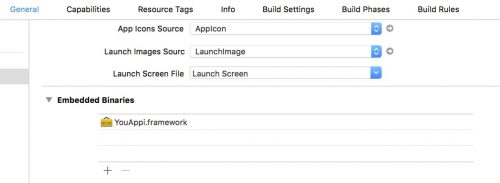
- Add the YouAppi.framework to General → Embedded Binaries
- Change to YES inside the build settings under the option ALWAYS_EMBED_SWIFT_STANDARD_LIBRARIES.

- Change to YES inside the build settings under the option DEFINES_MODULE.


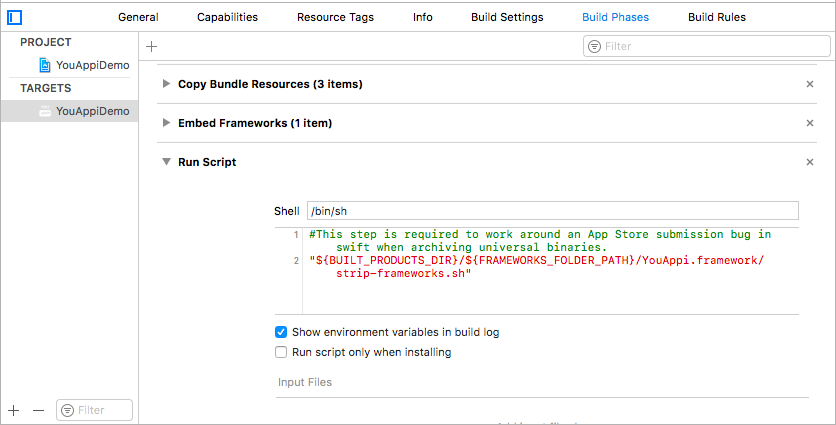
Build and archive for Apple store
In order to build and archive your app for the Apple Store you need to add the following:
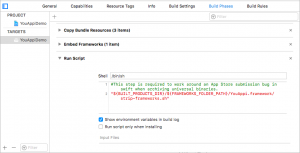
- Go to your app target.
- Select Build Phases.
- Go to Run Script section (you can add it by pressing + button if it doesn’t exist).
-
Add the following line in the text box:
"${BUILT_PRODUCTS_DIR}/${FRAMEWORKS_FOLDER_PATH}/YouAppiYagaMoat.framework/strip-frameworks.sh" - It should look like this:
Load and Show best practices
- Make sure to init the SDK as soon as the app starts. It might take few seconds to complete the init process.
- Make sure to load the ad about 30 seconds before you want to show it, since it takes time for the ad and assets to be prepared.
- make Make sure to show an ad as close as possible to loading an ad, in order to have a better fill rate and relevant ads.
- Make sure not to wait too long before showing an ad, since the ad will be expired 5 hours after being called for. In other words, “show” must be performed no more than 5 hours after the “load”.
- Use ad event listeners in order to be notified when an ad is ready to be shown.
- Use ad event listeners to handle load and show.
- Loading an ad too many times without showing it might cause YouAppi servers to block the SDK from requests.